CSAW CTF is one of the oldest and biggest CTFs in the world, with more than 900 teams participating in the 2022 edition. We would like to thank the organizers for the stable infrastructure and the creative challenges.
we finished first in the MENA region and 14th globally
Kudos to everyone in my team SOter14 for their huge work and efforts, you can catch up with out latest news at our website and twitter page
The contest was fun and challenging, we managed to solve 25 out of the 28 challenges in Pwn, Web, OSINT, Forensics, Steganography, Misc, Quantum Computing, AI, Cryptography, and Reverse Engineering.
Below are the writeups for forensics challs: Noir, Not Too Taxing (Crypto), and Encrypted disk.
# Noir: Digital Forensics / Steganography
Description
I am a forest, and a night of dark trees: but he who is not afraid of my darkness, will find banks full of roses under my cypresses. Friedrich Nietzsche.
The image contains a flag in the format (flag)this_is_the_flag
Challenge Link & Author
CSAW 2022 - Noir
Wen Jun L. Linkedin Profile
This challenge blowed our minds, it was part of CSAW’21 Finals and it is a 0-solves chall, so it was offered in the Quals of 2022. We’ve got an image, bit heavy around 9 MB that looks like a scene from a horror game, storm, forest, and darkness. It was a twisted chall!

First, we tried the normal steganogrpahy ways around it, but obviously that is a total waster of time.
It had 100+ on Aperisolve alone!
Technically, the image is merely noise in the three RGB channels whith contrast on few areas, that when included with the alpha channel gives the image as you see it! Amazing, it really feels like some streaming technique, a kind of standard that’s used by TVs to show pictures we can understand. But we neglected the thought of getting a video out of an image, how unfair! Instead we’ve thought of the noise as a raw data that we can feed to Audacity and hopefully get an audible thing out of it, using U-LAW since we’re dealing with RAW data, it made much sense, because we have seen some images filled with noise turning into audio. But a video, insane!

And of course, it was a video!
Noir represents a kind of movies, black and white, crime generally, and that’s how we finally went into the idea that we’re dealing with a video rather than an audio.
The Noir movies are taped to a stripe and played through a wheel showing still images 24 frames a second - Oh, keep that in mind! Still images mean also RAW data. That could help.
But still we wonder, how to extract the video.
Well it can’t be manually, there must be a tool, or it would be a total nightmare.
To save you some time, it was FFmpeg !!
FFmpeg is a free and open-source software project consisting of a suite of libraries and programs for handling video, audio, and other multimedia files and streams. At its core is the command-line ffmpeg tool itself, designed for processing of audiovisual files. Per Wikipedia.
Well, that means some sort of conversion, right? Yep, but from a single png to what? There are hundreds of video formats out there, some of them are no longer being used.
But we can narrow our results, to lightweight ones since the image is just 9 MB, 24 fps if that helps, RAW data, so no codecs!
FFmpeg command to convert formats is basically:
1 | ffmpeg -i source -pix_fmt pixelformat -f rawvideo - > output.extension |
You can specify the frames, although ffmpeg can pretty much detect that automatically.
We need the pixelformat and the extension. We’re getting close!
Hmm, since we’re dealing with an image, can’t the extension of the video we’re looking for be both an image extension and a video extension. WEBM answers that. How clever!
Webm is actually the only extension we’ve found thats a Joker, can be an image/audio/video. Which makes it special. That’s it, by luck, we got it, WEBM.
However we tried a lot of extenison, it was a game of trial and error, for instance we checked mp4, wmv, avi, mkv, flv, mov, you name it…
FFmpeg needs a pixel format, well, there is a hude table of these formats…
1 | name= yuv420p, nb_channels= 3, depth= 8, is_alpha=n |
Well, we didn’t guess, we, at this stage, after looking deeply into the image, and as said before, the RGB channels are carrying noise that surely represent the video, however the alpha channel is the one that shape the picture as we see it in the previews. So the pixel format we choose is rgb24 excluding the alpha channel.
The final command is:
1 | ffmpeg -i noir.png -pix_fmt rgb24 -f rawvideo - > vid.webm |
Coool, after all the hustle we’ve got a video, a subway with blinking lights, or should I say, Morse Code!
The clock was ticking, we’re at the final hours of the CTF, and the video is 2 mins long.
Could there be any OpenCV tool for this! Of course, here is a link you might need it as well MorseDecoder
Here is a link for the video as well video.webm
Using the tool, I let it record my screen and positioned the cross selection on the train lights. Within a minute we’ve got the flag!

Finally, it was a creative challenge we must say!
The flag is (flag)sil3nt_refl3ct1on
# Not Too Taxing: Digital Forensics / Cryptography
Description
We intercepted some email communications between a tax consultant and his client that contained some important tax documents. We were able to successfully extract two of the documents, but we can’t figure out the password to the file in order to extract the data. Attached are the two extracted files, Tax_Ret_Form_Blank.pdf and Tax_Ret_Form_Nov_2021.zip, and a transcript of the emails we found, SPBlock_Email.pdf.
Can you figure out the password so we can get this guy’s info?
Challenge Link & Author
CSAW 2022 - Not Too Taxing
In this challenge we were given, an encrypted zip archive containing a filled state tax form document for the month of Novemeber 2021, the emails transmitted between … and the client, as well as the template of the tax form blank.
We’ve noticed the zip was using the ZipCrypto Store compression, which is breakable if you can find 12 bytes of the data inside the zip, 8 of which got to be contiguous.
ZipCrypto is considered as the legacy encryption of archives, you must be aware that it is the default method used in most Linux distros: ZipCrypto Deflate. Thus you might want to manually change that method when compressing to AES for higher security.
The ZipCrypto algorithm generates a pseudo-random stream of bytes/keystream, which is XORed to the entry’s content. to produce the encrypted data. The generator’s state made of three 32-bits integers (keys), is initialized using the password and then contiuously updating as encryption goes on.
This encryption algorithm is vulnerable to known plaintext attacks to recover the content fully.
We’re going to use bkcrack tool which can recover the content of the archive, change a zip archive’s password, and recover the original password. All by retrieving the zip archive three generated keys.
The installation is pretty straight forward, just git clone the repo then,
1 | cmake -S . -B build -DCMAKE_INSTALL_PREFIX=install |
Well, we must use the blank tax form as our plaintext attack, as it shares a lot of identical bytes with the filled form inside the zip.
However you can’t just feed the pdf to bkcrack and hope for it to crack the zip. The tool requires a non encrypted zip with the similar bytes inside to attack the encrypted zip.
So let’s get our blank form inside a zip and specify the method of encryption as ZipCrypto and the compression level as store. Now we guarantee there are plenty of similar bytes to execute the attack.

First we retrieve the three keys from the zip archive using
1 | bkcrack -C Tax_Ret_Form_Nov_2021.zip -c Tax_Ret_Form_Nov_2021.zip -P Tax_Ret_Blank.zip -p Tax_Ret_Form_Blank.pdf |
-C: Specifies the encrypted zip archive
-c: Specifies the target file within the archive
-P: Specifies the plaintext zip archive
-p: specifies the plaintext file within the non encrypted archive.
Now let it process for a while, it should not take long, as we provided more than enough data to bkcrack.
Here are they keys I have got:
1 | b2c4a24e f036ff3a 998f6727 |
If the compression wasn’t Store, and instead it was Deflate, then the Github repo provides some python scripts to decompress those types, just first include -d deciphered at the end of the previous command.
Then run:
1 | python3 tools/inflate.py deciphered decompressed |
In our case, it was just Store, so we move on to the next step, we’re going to recreate the very same archive with a password of our choise, this is the fastest way around Zip crypto archives, you can go ahead and retrieve the password, we will show that. However that process will take a bit longer.
1 | bkcrack -C Tax_Ret_Form_Nov_2021.zip -k b2c4a24e f036ff3a 998f6727 -U unlocked.zip 1234 |
And within a second, we got our new archive with the filled document restored successfully!

And the flag was: flag{1f_y0u_u53_z1pcryp70_4ny0n3_c4n_aud17_y0u}
However if you want the hard way, you can retrieve the original password of the archive using the three keys, you might need to know the length though, or guess it. Tideous task…
Anyways, here is the command you would use for that:
1 | bkcrack -k b2c4a24e f036ff3a 998f6727 -r 8..12 ?p |
-r to specify the length, it can be a rough number or an interval.
Sorry, I didnt bother to get the password 😃)
It was a creative challenge. However I must say that we did not check the email content document at all lol!
# Encrypted Disk: Digital Forensics
Description
th31nk encrypted his disk and forgot the password, can you help him? Flag is what you find, no need to wrap
HINT: Custom Profile
Challenge Link & Author
CSAW 2022 - Encrytped Disk
Crazyman Twitter Profile
In this challenge we got a disk image & a memory dump. The Description tell us that the user encrypted his disk and forgot the password! So we can understand that the memory dump will help us to decrypt the disk to get the flag! right?? Let’s Check what we have !
1 | 4n6nk8s@csaw2022:~$ file * |
As you see we have LUKS encrypted file version1! I will say it again! it’s verion 1!!!
Oh wait what is LUKS??!
LUKS or the Linux Unified Key Setup is a disk encryption specification created by Clemens Fruhwirth in 2004 and was originally intended for Linux.
While most disk encryption softwares implement different, incompatible, and undocumented formats, LUKS implements a platform-independent on-disk format for use in various tools. This not only faciliates compatibility and interoperability among different programs, but also assures that they all implement password management in a secure and documented manner. Per Wikipedia.
Unlike most blogs say, you should stick with LUKS2 if you are applying it to your disk, since it provides an extra layer of security by storing the master key in the kernel directly. However LUKS1 masterkey gets loaded in the RAM when you try to unlock it, and that what we are going to grab from the memory dump!
The encrypted master key is stored as plaintext in the LUKS header. However once we mount it and get prompted to enter a passphrase, at least one of eight (LUKS support up to 8 passphrases), the decrypted master key (AES) is loaded into the memory.

Image courtesy: MDPI
When we tried to use Volatility.py against the memory dump we had some troubles finding the right profile.
We are sure that this memory image is linux one, because we have LUKS. Let’s figure out what is the distrubition and the version to search or make our volatility profile to work with!
1 | 4n6nk8s@csaw2022:~$ strings memory.ram | grep "Linux version" |
Oh it’s Ubuntu 16.04.4 with low-latency kernel! oh wait what? what did you mean by low-latency kernel?
As I know there is various type of linux kernel like Real-tim kernel, generic kernel, Low-latency kernel
This types of kernel varies in the type of the scheduler and their algorithm, as well as the system interuption… etc! None is better than the other! Each one has its use case.
For example the low-latency one can reduce audio latency and the context switches are more frequent. This type of kernel has a scheduler that is not suitable for a server environment! But it will be good for a professional audio or video editing!
Ok now i guess you get it ! It’s time to make our profile! In this demo we will make a volatility profile with low-latency kernel using docker container. It’s better than downloading a whole VM! Don’t waste time in that!
Let’s download volatiltiy man
1 | 4n6nk8s@csaw2022:~$ git clone https://github.com/volatilityfoundation/volatility |
In Volatility repository there is /tools/linux directory that contains tools that allow us to make a linux profile. In this directory there is a file called Makefile that contains important information ! Let’s check it!
1 | 4n6nk8s@csaw2022:~volatility/tools/linux/$ cat Makefile |
Look at the KVER variable , it contains your current kernel version! it’s an automatic kernel detection! in our case we will change it with the version of kernel that we will use it! Check the Linux Version from the output of the last strings command that we runed on the memory dump.
change $(shell uname -r) with 4.4.0-72-lowlatency . Do it manually or use the magic of sed command
1 | 4n6nk8s@csaw2022:~volatility/tools/linux/$ sed -i 's/$(shell uname -r)/4.4.0-72-lowlatency/g' Makefile |
Now it’s time to run a Ubuntu 16.04.4 docker container and mount the current direcotry that contains the tools to build the profile. We can use the variable environment $PWD to indicate the current path easly. Don’t waste your time writing the whole path man !
1 | sudo docker run -it --rm -v $PWD:/volatility ubuntu:16.04 /bin/bash |
Just wait until the container is pulled & get your bash !
1 | Digest: sha256:91bd29a464fdabfcf44e29e1f2a5f213c6dfa750b6290e40dd6998ac79da3c41 |
Since our ubuntu container is ready to use. Let’s install the low-latency kernel and the essentials packages for building the profile.
1 | root@507b1a4007ff:/# apt update && apt install -y linux-image-4.4.0-72-lowlatency linux-headers-4.4.0-72-lowlatency build-essential dwarfdump make zip |
Ah man you’ll wait again until the installation is done! After the installation is finished let’s check our volatility tools inside the container then make the profile !
1 | root@507b1a4007ff:/# ls |
Now let’s zip the result of the make command (module.dwarf) and the system map file from the /boot :
-
The system map file contains the Symbols that will be used by volatility to run the plugin correctly. It list function entry points and addresses of kernel data structures of a particular build of a kernel!
-
The
module.dwarfcontains thevtypesof this kernel module! To make we can callvtypesas the kernel’s data structures. To make it more easyvtypesis a small library to defineValidating Typesthat will be used by the kernel !
Why we zip the module.dwarf and the System.map file? It’s simple man! These two files represent the whole profile that will be used by volatility! Volatility requires these 2 files to be in zip to deal with it as profile! Wow man, our profile is coming!
zip Ubuntu1604.zip module.dwarf /boot/System.map-4.4.0-72-lowlatency
1 | root@507b1a4007ff:/volatility# zip Ubuntu1604-low.zip module.dwarf /boot/System.map-4.4.0-72-lowlatency |
Now just leave our ubuntu container. we finished the 1st step of the challenge and you learn how to make a cool & custom linux profile! Now you can copy this zip file to /plugins/overlays/linux/ directory in your volatility environment.
Sanity Check please ! Let’s list all the ubuntu profiles available!
1 | 4n6nk8s@csaw2022:~$ vol.py --info | grep -i ubuntu |
Cool! we found our new profile recognized by volatility ! Now it’s time to try use it.
1 | 4n6nk8s@csaw2022:~$ vol.py -f memory.raw --profile=LinuxUbuntu1604-lowx64 linux_banner |
Bingo!! Our profile is ready to work! Let’s start the investigation now
I started checking the bash history!
1 | vol.py -f memory.raw --profile=LinuxUbuntu1604-lowx64 linux_bash |
Let’s analyse this history together to understand what is going on here!
- The user install low-latency kernel
- install lynx : a terminal-based web browser for all Linux distributions
- edit the /etc/fstab.
- edit /etc/crypttab
- copy the directories from media (it can be a flash) partition to
/mnt/ - Check the connectivity by pinging the DNS server of google (I used to do the same test :3)
- generate a key with gpg using rsa4096. Something will be encrypted in the next commands! I am sure
- use lynx to search for porno password collection! mmm He want a premium account
- Encrypt
findme.txtfile using gpg !! This will generate an encrypted filefindme.txt.gpg - Search for troll password!
- Encrypt
end.zipwith gpg again! We haveend.zip.gpg, another encrypted file! - edit a file text called
dic_fr_l33t.txt - remove
findme.txt. I guess we need to recover this file ! - remove the directory that contains the
dic_fr_l33t.txtfile
/etc/fstab: is a configuration table designed to ease the burden of mounting and unmounting file systems to a machine. It is a set of rules used to control how different filesystems are treated each time they are introduced to a system
The /etc/crypttab (encrypted device table) file is similar to the fstab file and contains a list of encrypted devices to be unlocked during system boot up. This file can be used for automatically mounting encrypted swap devices or secondary file systems.
Ok the encrypted disk contains a end.zip.gpg and findme.text.gpg . These 2 files are the key of the task! The flag is on these files! So we need to decrypt to disk and mount it!
# Decrypt Disk and MOUNT IT
Dealing with the disk we require cryptsetup --a tool to manage plain dm-crypt and LUKS encrypted volumes, to install it, use sudo apt install cryptsetup-bin .
Analyzing the disk image to understand what we need to next!
command cryptsetup luksDump forensic.img will return some useful LUKS information:
1 | LUKS header information for forensic.img |
It is clear as day that once we have the master key --the one used to control the disk the way we want, we can add a key slot/passphrase.
As said in the introduction, the master key must be loaded into the RAM, we know it is AES, so using findaes tool here
Then, extract the downloaded zip file
unzip findaes*.zip
Compile it
cd findaes* ; make
And run it against the memory dump
./findaes memory.raw
And you get this!
1 | Found AES-128 key schedule at offset 0xad9f450: |
Going further is a routinuous disk encryption operation, with the masterkey in hand, we can generate a new passphrase say 1234 or p@ssw0rd for us to access the content.
1 | echo -n "8d 3f 52 7d e5 14 87 2f 59 59 08 95 8d bc 0e d1" | tr -d " " | xxd -r -p > masterkey.key |
Let’s see if it is now placed as Key Slot 1!
1 | cryptsetup luksDump forensic.img | grep Key.Slot |
All good!
Now, we mount it!
1 | sudo cryptosetup luksOpen forensic.img mydata |
Just fill in your new passphrase in the previous step, and you’ll have it!
If you got some permission concern while trying to access the mount point, just switch to root!
After decrypting the disk and mounting it! We find 2 directories! dir2 and lost+found . OK I can say skip & ignore lost+found directory. The dir2 is our target. Let’s get our flag man!
1 | 4n6nk8s@csaw2022:~/csaw/dir2$ ls |
Let’s check the readme.txt first, Just i am trying to be patient before attacking the findme.txt.gpg
1 | 4n6nk8s@csaw2022:~/csaw/dir2$ cat readme.txt |
Ah man! We know that! We need to decrypt the gpg files. But wait! where is the end.zip.gpg file!
Ok it’s not important for me! I guess findme.txt.gpg is the flag! Let’s decipher it with gpg command line utility. Of course we will use 1m_4n_4dul7_n0w password!
1 | 4n6nk8s@csaw2022:~/csaw/dir2$ gpg --output findme.txt --decrypt findme.txt.gpg # it will ask you for a password |
Ah man ! I don’t find the flag! OK still the end.zip.gpg ! Let’s find this, i guess it’s hiding in end.png image
1 | 4n6nk8s@csaw2022:~/csaw/dir2$ sudo binwalk end.png |
Finally we found it, let’s use foremost command to extract our target !
1 | 4n6nk8s@csaw2022:~/csaw/dir2$ foremost end.png |
A new directory called output is created and it contains the extracted files from end.png using
1 | 4n6nk8s@csaw2022:~/csaw/dir2$ tree output |
OK let’s unzip the 00000964.zip file and decipher the end.zip.gpg file using Troll_Tr0ll_TrOll password and get our flag
1 | 4n6nk8s@csaw2022:~/csaw/dir2$ unzip output/zip/00000964.zip |
Ah finally there is a flag.gif file in end.zip file but wait!! the zip file is protected!
We’ve noticed that the encryption is ZipCrypto Deflate which is similar to the other chall, crackable by just knowing 12 bytes of whats inside the zip, 8 of which must be contiguous.
We’ve went ahead, used the header of a GIF file, and digging more into the GIF file structure, we’ve came to know that in most of the GIF files there is a constant text ‘NETSCAPE’ at the hexadecimal offset 0x310 which fulfills our needs, 8 bytes contiguous plus the header, we’ve got more than 12 bytes.
The header is just GIF89a at offset 0x0.

You can get bkcrack from here
-C to specify the ciphered zip, -c for the target file -x to specify known bytes at some offset and -d to get the deciphered data once the process is done, and keys were found!
1 | ./bkcrack -C end.zip -c flag.gif -x 0 474946383961 -x 0x310 4E4554534415045322E30 -d deciphered |
Unfortunately, it ended with Could Not find the keys.
However we were not lucky to crack the zip open using bkcrack again.
Don’t worry dude! we have rockyou and john! Let’s give bruteforcing a chance. We can extract the password hash with zip2john command!
1 | 4n6nk8s@csaw2022:~/mnt/dir2$ zip2john end.zip > zip.hash |
Now it’s time to bruteforce the hash with rockyou!
1 | 4n6nk8s@csaw2022:~/mnt/dir2$ john --wordlist=$rockyou zip.hash |
Wait what??? The password wasn’t found on rockyou! What the hack?? After some investigating we remember that there is a text file called dic_fr_l33t.txt ! dic means dictionary and fr means french right ? Oh man we need to recover this wordlist! But the user deleted it. I’ll give a chance to linux_find_file . Let’s try to dump this text file. It might be stil loaded in the memory right?
1 | 4n6nk8s@csaw2022:~$ vol.py -f memory.raw --profile=LinuxUbuntu1604-lowx64 linux_find_file -L | grep dic_fr |
Ah God! The extracted file is empty. We need another way to recover the wordlist and with an elegent way
After some minutes of thinking. We decide to use a regex that allow us to collect words that not contains special chars like {_;}/][-
1 | 4n6nk8s@csaw2022:~$ strings memory.raw | grep -v " \|\_\|\-\|\[\|\]\|\`\|\;\|\/\|\.\|\}\|\{" | sort | uniq | sort > myrock.txt |
Oh man we did it! The password of the protected end.zip is Cyb3rs3curit3 (CyberSecurité).Let’s extract the flag.gif file now…

Let’s convert this gif to frames using ffmpeg utility, the magical one xD
1 | 4n6nk8s@csaw2022:~$ mkdir temp ; ffmpeg -i /mnt/dir2/flag.gif -vsync 0 temp/temp%d.png |
We got this images! oh we have 36 QR Code images! Seriously i don’t want to scan it manually!

Let’s Write a small code that reads all these QRcode images! I am too lazy man !
1 | import cv2 |
Let’s run the code now ! I wish this nightmare finish dude! I don’t another step please
1 | 4n6nk8s@csaw2022:~$ python3 temp/solve.py |
And Finally we got the flag!
# Quantum Leap : Misc
Description
My friend took the quantum leap and purchased a quantum computer with two qubits. They mentioned using a quantum logic gate to input the flag and they gave me the computers output. I have been stuck and Can NOT figure out the flag.
Challenge Link & WriteUp Author
CSAW 2022 - Quantum Leap
Mida0ui Linkedin Profile
The description mentions that we’re dealing with a quantum computer with two qubits, se we can assume that the gate the person used to get the output is a two-qubit quantum logic gate.
A quantum gate is basic quantum circuit operating on a small number of qubits, they perform operations to change the state of the qubits, and unlike many classical logic gates, quantum logic gates are reversible.
Each quantum gate has its matrix, and since the qubit states are represented with vectors, the gates transform these vectors to get new states.
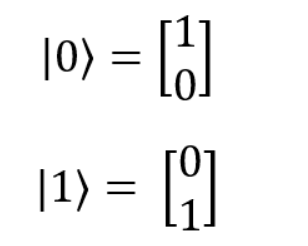
The state vectors of the states |0> and |1> are:
The CNOT gate was applied, it’s a two-qubit quantum gate that performs a controlled NOT where one qubit is the control and the second qubit is the target.
Its matrix is the following :
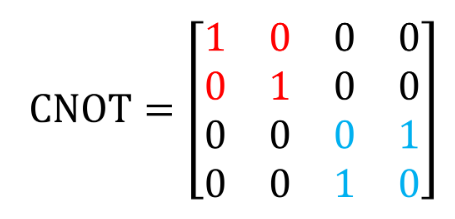
When applied:
The mathematics behind these results are simple:
Lets take |10> and |11>:
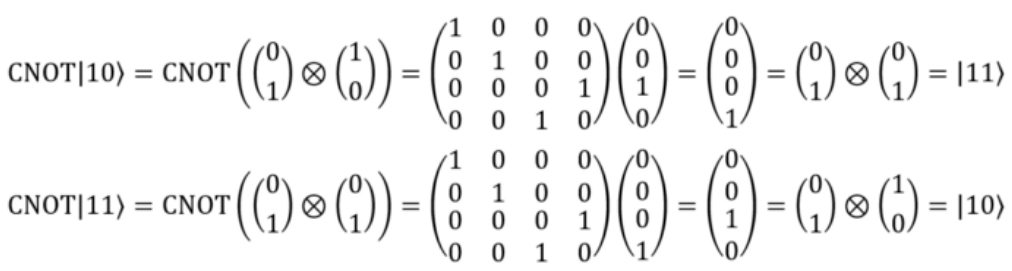
This ⊗ represents a tensor product, you can read about it here if you don’t know what it is : https://www.math3ma.com/blog/the-tensor-product-demystified
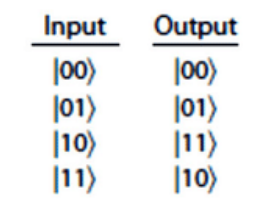
The first qubit is usually referred to as the control qubit and the second qubit as the target qubit. Expressed in basis states, the CNOT gate:
leaves the control qubit unchanged and performs a Pauli-X gate or NOT gate (which just flips the state of the qubit) on the target qubit when the control qubit is in state ∣1⟩;
leaves the target qubit unchanged when the control qubit is in state ∣0⟩.
As you may have noticed, this challenge can be done manually by converting the output string to binary, taking two bits at a time and checking the value of the most significant bit, if it’s 1, the other bit is flipped, else, nothing is done.
I wanted to solve this task with the CNOT gate itself,using the qiskit module in python.
Qiskit is an open-source SDK for working with quantum computers at the level of pulses, circuits, and application modules.
As mentioned before quantum logic gates are reversible, in this case, when CNOT gate is applied once on the output, we get the flag.
Here’s the script, you can run it on jupyter notebook:
1 | from qiskit import * |
The flag is flag{4_qu4ntum_g4t3}